When it comes to RC aircraft, getting your center of gravity (CG) right can make the difference between a smooth maiden flight and a nerve-wracking experience. Today, I’m taking a detailed look at the Fly-Right RC CG Jig – a sophisticated system that combines Bluetooth scales and laser technology to achieve precision accuracy. But with a premium price tag, is it worth the investment?
First Impressions: Unboxing the Fly-Right RC CG Jig
Right off the bat, I appreciate products that come in proper protective cases. Since you’re not checking CG every day, being able to tuck this away safely between uses is a real plus. Before we dive deeper, I should mention this is a sponsored review – the product was sent to me free of charge. That said, I’ll be giving you my honest opinion, good or bad.
What’s in the Box?
Opening up the case, you’ll find:
- A comprehensive user manual (it looks complicated at first, but it’s actually straightforward)
- Heavy-duty, solid aluminum frame system with anodized finish
- Laser measurement tool with three separate lasers (vertical, horizontal, and positioning)
- Mounting rails and adjustable components on smooth-rolling wheels
- Precision digital readout screens
- Cup holders for the scales
- Allen keys and spare parts
- Extension pieces for larger aircraft (available separately)
The frame extensions are particularly noteworthy – they allow you to accommodate significantly larger models beyond the standard configuration.
The Bluetooth Scales: A Separate Purchase
The CG jig itself doesn’t include the scales, which are sold separately. I’m using Sky RC Bluetooth scales for this review. These miniature scales are impressive pieces of technology:
- USB rechargeable batteries
- Bluetooth connectivity to the RC Gears mobile app
- Three scales total: two for main wheels, one for tail/nose wheel
- Compatible with both tricycle and tail-dragger configurations
This is an important consideration when budgeting – the total investment includes both the jig and the scales.
Assembly and Setup
I’ll be honest – my first assembly took about 30 minutes. The instructions are there, though I may have been guilty of not reading them as carefully as I should have! Once you’ve done it once, subsequent setups should only take about 5 minutes.
The System Configuration
The assembled jig features a T-bar design with several key components:
- Main rail system: Extends and contracts for different aircraft sizes
- Sliding scale platforms: Move on precision wheels for positioning
- Laser mount: Slides both forward/backward and left/right for accurate measurements
- Digital readout screens: Incredibly sensitive, measuring to within fractions of a millimeter
The build quality is excellent – this is clearly professional-grade equipment with anodized aluminum construction that feels substantial and well-engineered.
How It Works: The Three Key Measurements
The system requires three measurements to calculate your CG accurately:
1. Wheelbase Distance
This measures from the centerline of your main wheels to the centerline of your tail (or nose) wheel. The built-in digital readouts make this incredibly accurate. There’s a 60.9mm offset built into the system to account for the scale cup holders, which is automatically factored into your measurements.
2. CG to Main Wheel Distance
Here’s where the laser really shines. You zero the laser at the main wheel centerline, then slide it along the rail until it aligns with your marked CG point on the aircraft. The digital readout gives you a precise measurement. This eliminated a major source of error I discovered – I was off by 3-4mm using traditional ruler measurements!
3. Weight Placement Distance (Optional)
If you need to add weight to balance your aircraft, this measures where that weight should be placed relative to the main wheels.
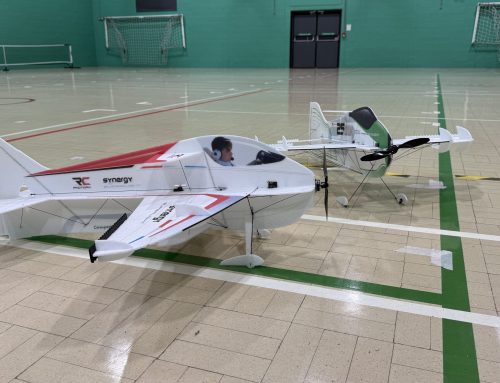
Real-World Testing: Two Aircraft Examples
Test 1: Extreme Flight Extra 260 (67-inch)
I started with my go-to aerobatic model – a 67-inch Extreme Flight Extra 260 that I fly regularly. I thought it was balanced correctly because it flies well, but I’d never actually checked it properly.
The results were eye-opening. After entering my measurements into the RC Gears app and placing the aircraft on the scales, the system indicated I needed to move 336 grams forward. My battery was positioned along the rear spar, but the jig showed it should be much further forward – right up front, in fact.
The sensitivity is remarkable. Walking around the room actually affected the readings slightly as the floorboards flexed! For this type of aerobatic aircraft, CG isn’t as critical as some people fly them tail-heavy for easier harrier and prop-hanging. Still, it’s fascinating to see how far off I was from the manufacturer’s recommended CG.
Test 2: Flex Innovations Mamba
For my second test, I used a larger Flex Innovations Mamba that I hadn’t flown yet – making this a perfect opportunity to get the CG right before the maiden flight.
Here’s where I discovered a clever trick: The manufacturer specified the CG as 81mm from the leading edge of the lower wing. Instead of using a ruler (which I’d done incorrectly the first time), I used the laser:
- Position the laser at the leading edge and zero it
- Move the laser back exactly 81mm using the digital readout
- Mark that position – guaranteed accurate!
- Zero again and measure back to the wheel centerline
This method is far more accurate than trying to measure with a ruler, especially on compound curves or awkward wing positions.
The Mobile App Experience
The RC Gears mobile app ties everything together. Once all three Bluetooth scales are connected and your measurements entered, the app provides real-time feedback showing:
- Current weight distribution
- How many grams need to be added or moved forward/backward
- Visual indicators when you’re at the correct balance point
The app responds instantly as you move components around, making it easy to fine-tune your setup. You can watch the readings change in real-time as you adjust battery positions or add/remove equipment.
Practical Considerations
Space Requirements
You need significant space to use this system effectively. I found working on the floor challenging – constantly laying down to check readings and laser alignment. For larger aircraft, working outside or on a large table at a comfortable height would be much better.
The Tubing Solution
To get accurate readings, tail-draggers need their tail raised to flight attitude. The system uses simple plumbing tubing with 3D-printed adapters. It works, but it’s not elegant – you need to source the correct diameter tubing yourself and cut it to length for each aircraft. This feels like an area where a more integrated solution would be welcome.
Level Surfaces Matter
The scales are incredibly sensitive, so you must work on a completely level surface. Any flex or tilt will affect your readings.
The Verdict: Is It Worth the Price?
The Pros:
- Exceptional accuracy: Laser precision eliminates measurement errors
- Professional build quality: Anodized aluminum construction built to last
- Excellent protective case: Keeps everything organized and protected
- Real-time feedback: See instant results as you make adjustments
- Expandable: Extensions available for larger aircraft
- Works for all gear types: Tricycle and tail-dragger compatible
The Cons:
- Expensive: Premium pricing, and scales are sold separately
- Space-intensive: Requires significant working area
- Initial learning curve: First setup takes time
- Tubing solution: DIY approach feels less refined than the rest of the system
- May be overkill for small models: Probably not necessary for basic sport planes
My Recommendation
For smaller, inexpensive sport models, traditional methods work fine and this system is probably overkill. However, for larger aircraft, scale models, and especially jets, the Fly-Right RC CG Jig absolutely justifies its cost.
When you’re putting £4,000+ turbine jets in the air, or flying large scale aerobatic aircraft, getting the CG precisely right isn’t just nice to have – it’s essential for a successful maiden flight and optimal performance. I learned this the hard way with my Ultimate, fighting both engine issues and CG problems simultaneously on the first flight. It was horrible and put me off the model for weeks.
The peace of mind and precision this system provides makes it worthwhile for serious modelers with expensive aircraft. I’m keeping mine and plan to use it on my Krill Ultimate, Krill Extra (a massive 3-meter model), and my upcoming FTL Lancer jet build.
Final Thoughts
The Fly-Right RC CG Jig represents the cutting edge of RC aircraft balancing technology. It’s not for everyone, but for those flying larger, more expensive models where precision matters, it’s an invaluable tool. The laser measurement system eliminates guesswork and the real-time app feedback makes achieving perfect balance straightforward.
Yes, it requires investment in both the jig and separate scales. Yes, you need space to use it properly. But if you’re serious about the hobby and flying aircraft where CG precision is critical, this system delivers professional results that justify the cost.
For my next balancing sessions, I’ll be taking the setup outside where I have more room to work comfortably. The experience has already paid dividends by revealing how far off my “well-flying” Extra actually was from its specified CG.
What are your thoughts? Would you invest in a precision CG system like this, or do traditional methods work well enough for your flying? Let me know in the comments below!