Introduction: A First Look at Phoenix Models
Welcome back! Today I’m doing something a bit different – unboxing my very first Phoenix Models aircraft. This is the Slick 580, a 70cc aerobatic model, and I genuinely have no prior experience with this manufacturer’s products, so I’m quite intrigued to see what’s inside.
Before we dive in, I want to give a massive shout out to Model Shop Leeds, who made this review possible. They work with Phoenix Models and arranged this entire unboxing and review series. This will be a multi-part series covering the unboxing, assembly, and finally, flight testing – so expect at least three videos covering this model comprehensively.
First Impressions: What’s in the Box?
The model arrives in a box within a box – always a good sign for protection during shipping. Here we have the Slick 580 V2, measuring 86.5 inches (2.2 metres) with an “All Ready to Fly” designation. Right away, I must admit the colour scheme caught my eye – it looks rather smart with its combination of red, blue, and orange topside, with grey and blue underneath.
Key Specifications
- Wingspan: 86.5 inches (2.2 metres)
- Length: 2.1 metres
- Flying weight: Approximately 8 kilograms
- Engine size: 60-70cc
- Construction: Carbon fibre reinforced
- Includes: Carbon spinner and backplate
Unpacking the Components
Opening the box reveals excellent packaging – everything is secured with cardboard separators and bubble wrap, ensuring nothing moves during transit. Let me walk you through what’s included:
Tail Surfaces
The horizontal stabilisers were surprisingly light when I lifted them out – I wasn’t quite expecting that. They’re constructed from carbon fibre, and here’s something pleasantly surprising: they’re pre-hinged. Not only that, but the covering goes inside the hinge line as well, which is a nice professional touch. You can see the colour scheme clearly – red, blue, and orange on top, with grey and blue underneath.
The rudder is substantial in size and comes with separate hinges that you’ll need to install yourself. At first glance, the hinge holes look slightly messy, though I’m confident they’ll tidy up once the hinges are fitted. If not, a quick pass with an iron should sort that out.
Wing Panels
This is where Phoenix Models really caught my attention with their attention to detail. At the very tip of each wing panel, they’ve applied small protective dots over the covering. These dots prevent the covering from peeling at the tips – typically the first area to lift on any model. I’ve seen these dots sold separately before, but I’ve never seen them pre-applied by a manufacturer. It’s a small touch, but it shows genuine thoughtfulness from people who clearly fly these models themselves.
The wing panels are, like the elevators, pre-hinged. However, the servo boxes aren’t cut out yet, and the control horns aren’t installed – so there’s a bit of work to do during assembly, which is perfectly fine. The quick-release mechanism uses screws at the wing root, and there’s a carbon wing tube included.
Side Force Generators (SFGs) are also included. I tend to use these on smaller models, though on a model this size, I probably won’t bother. That said, during the review flights, I will try them as supplied to give you a proper assessment.
Fuselage and Accessories
The fuselage packaging demonstrates the care taken in shipping. Everything is secured properly – the wing tube, tail tube, and painted carbon fibre undercarriage are all well protected.
Opening the accessory boxes revealed several pleasant surprises:
- Decal sheet: Packaged separately in its own box to prevent damage or curling – smart thinking. The freestyle Slick 580 lettering has a rather attractive rainbow effect with blue, red, and green. There are also Team Phoenix stickers and various other decals I’ll definitely be applying.
- Carbon spinner: Not only is it carbon fibre, but it’s also painted with Phoenix Models branding. It comes with an aluminium (or aluminum for my American viewers) backplate, nicely finished. Not every manufacturer includes these, so this is appreciated.
- Wheel spats: These have reinforced interiors with pre-applied “Slick 580 3D Freestyle” lettering. The paint work is excellent, and they’re ready to install.
- Cowling: Features pre-installed foam baffling to funnel airflow through to the engine – another thoughtful inclusion.
- Fuel tank: A quality unit is included, which makes sense given the “All Ready to Fly” designation on the box.
- Wheels and hardware: An anodised red tail wheel assembly, various carbon plates, screws, bolts, and what appears to be a CG (centre of gravity) measuring tool.
Fuselage Details
The fuselage features a magnetic hatch with two pegs – a nice, clean design. Inside, there’s extensive use of ply laminated with carbon fibre, providing strength without excessive weight. There’s a tube for running wires, and the wing attachment uses a “Smart Lock” push-to-lock mechanism – press down to lock the wing, press again to release. These are fitted both front and back.
Those protective dots I mentioned earlier? They’re everywhere on the edges throughout the model. Phoenix Models has clearly thought about longevity.
Assembled First Look
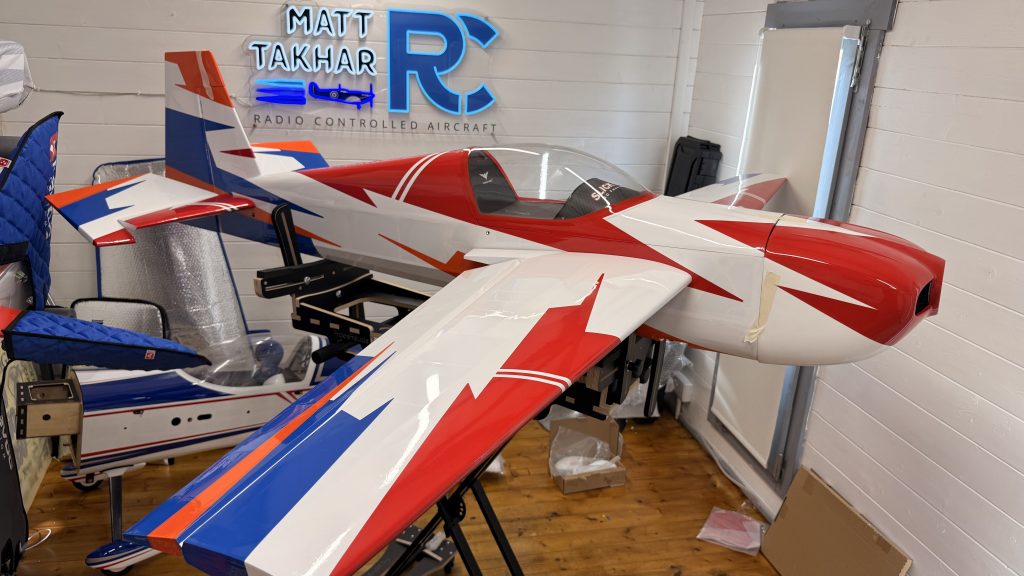
I’ve temporarily assembled the model – wings attached, horizontal stabiliser in place, and the cowling and rudder taped on just so you can see it all together for the first time. Obviously, none of it’s properly built yet – that’s coming in the next video.
Price Point and Value Assessment
Now, here’s where things get interesting. This model is listed at £797 on Model Shop Leeds’ website (in stock at the time of filming). That’s £800, which represents genuinely good value in the current market.
How Does It Compare?
The price point is notably lower than many competitors, but let me be clear about what that means. There are a few things some competitors include that Phoenix doesn’t, and vice versa:
What some competitors offer that this doesn’t:
- Pre-installed control horns (though this isn’t a big deal – just saves a bit of time)
- Quick-release rudder for easier transportation
What Phoenix includes that not everyone does:
- Carbon fibre spinner and backplate
- Fuel tank
- Comprehensive hardware package
- Pre-applied protective covering dots
- Pre-installed foam baffling in the cowling
What’s Next?
In the assembly video (part two of this series), I’ll be making a complete list of additional components I’ve purchased to get this model airworthy. I’m planning to give Model Shop Leeds a call and purchase all the finishing bits from them – I think that’s only fair given their support for this review.
I’m currently torn between two power options: going electric with a large setup running 12S 6000mAh packs, or going with petrol. By the time you’re watching this, I’ll probably have already made that decision and purchased the equipment. I’ll be posting a photograph on Facebook asking for your input, so if you follow me there, keep an eye out for that.
Workshop Queue
For those who follow my YouTube channel regularly, you’ll have noticed I’m back to producing videos almost weekly. I have several builds ongoing simultaneously, and the reason I switch between projects is typically because I’m waiting for parts to arrive. This allows me to utilise my time efficiently rather than sitting idle.
Right now, I’ve been filming content on my FTL Lancer and other models, and I thought I’d slot this unboxing in whilst waiting for components. So if you’re waiting for a particular video, don’t worry – it’s in the queue and coming up along with several others.
Final Thoughts
My initial impressions of the Phoenix Models Slick 580 are genuinely positive. I wasn’t sure what to expect given the competitive pricing, but the quality and attention to detail have impressed me. Those small touches – the protective dots, the pre-installed foam baffling, the quality of the spinner – all add up to show a manufacturer that understands what modellers need and appreciate.
Is this a sponsored video? From that perspective, yes – I haven’t paid for this model. However, as always, I’ll tell you what I like and what I don’t like. So far, it’s a big thumbs up from me, and I’m genuinely looking forward to getting this in the air.
Thanks again to Model Shop Leeds and Phoenix Models for providing this kit. Join me for part two where we’ll tackle the assembly!